This post contains affiliate links. This means I earn a small commission at no cost to you. You can view my affiliate disclosure here.
Every time you see a tiny seed sprout into a sturdy seedling under your care, you're watching the humble beginning of food, flowers, and abundance in your garden.

Starting plants from seed isn’t just about saving money; it’s about freedom of variety, control over quality, and the satisfaction of growing what you eat from the very beginning. Whether you’re planting heirloom tomatoes, fragrant herbs, or vibrant flowers, this beginner-friendly guide will walk you through every step: from setting up your seed starting space to planting, thinning, and hardening off seedlings.
Here’s how to grow healthy, robust starts that are ready to thrive outdoors when the season arrives.
My sourdough was flat and business was slow
When I first started homesteading, my sourdough was dense and flat, my garden struggled, and it seemed like I was scrambling to get people to notice my business, let alone, buy my products. And for a time, I burnt out.
After years of trial and error, analyzing hundreds of businesses from other sectors, and just pure grit...
I created a free Zero to Homestead Skool Community: a place where homesteaders of all levels share wins, troubleshoot challenges, and get guidance from experienced peers. By joining, you’ll access step-by-step guides to build traditional skills (sourdough, fresh milled flour, traditional foods, preserving, livestock, gardening, and more) plus full courses, workshops, and homestead business-building resources with a supportive network to help your homestead thrive.
Why Start Seeds Indoors?
Starting your own seeds gives you:
- More variety than what nurseries carry
- Better control over soil quality and health
- A lower cost per plant
- Stronger, disease-free starts
- More consistent timing for your climate
Many heirloom and unusual varieties, like bitter melon and specialty peppers, are only available as seeds. Growing your own lets you plant what you truly want. My favorite places to buy seeds are from Johnny's, High Mowing (click here for 10% off with my affiliate code), Botanical Interests/Epic Gardening (get 5% off with my affiliate code), MIgardener, and Baker Creek.
Creating Your Seed Starting Space
A good seed starting setup doesn’t need to be fancy but it does need the right conditions.
Choose the Right Location
Most gardeners find success starting seeds in a warm room like a laundry room (which is what I use) rather than a cold garage or basement. Room-temperature spaces help seeds germinate more reliably. If you do choose an unheated location, put in an additional heat source (especially for warmer weather crops).
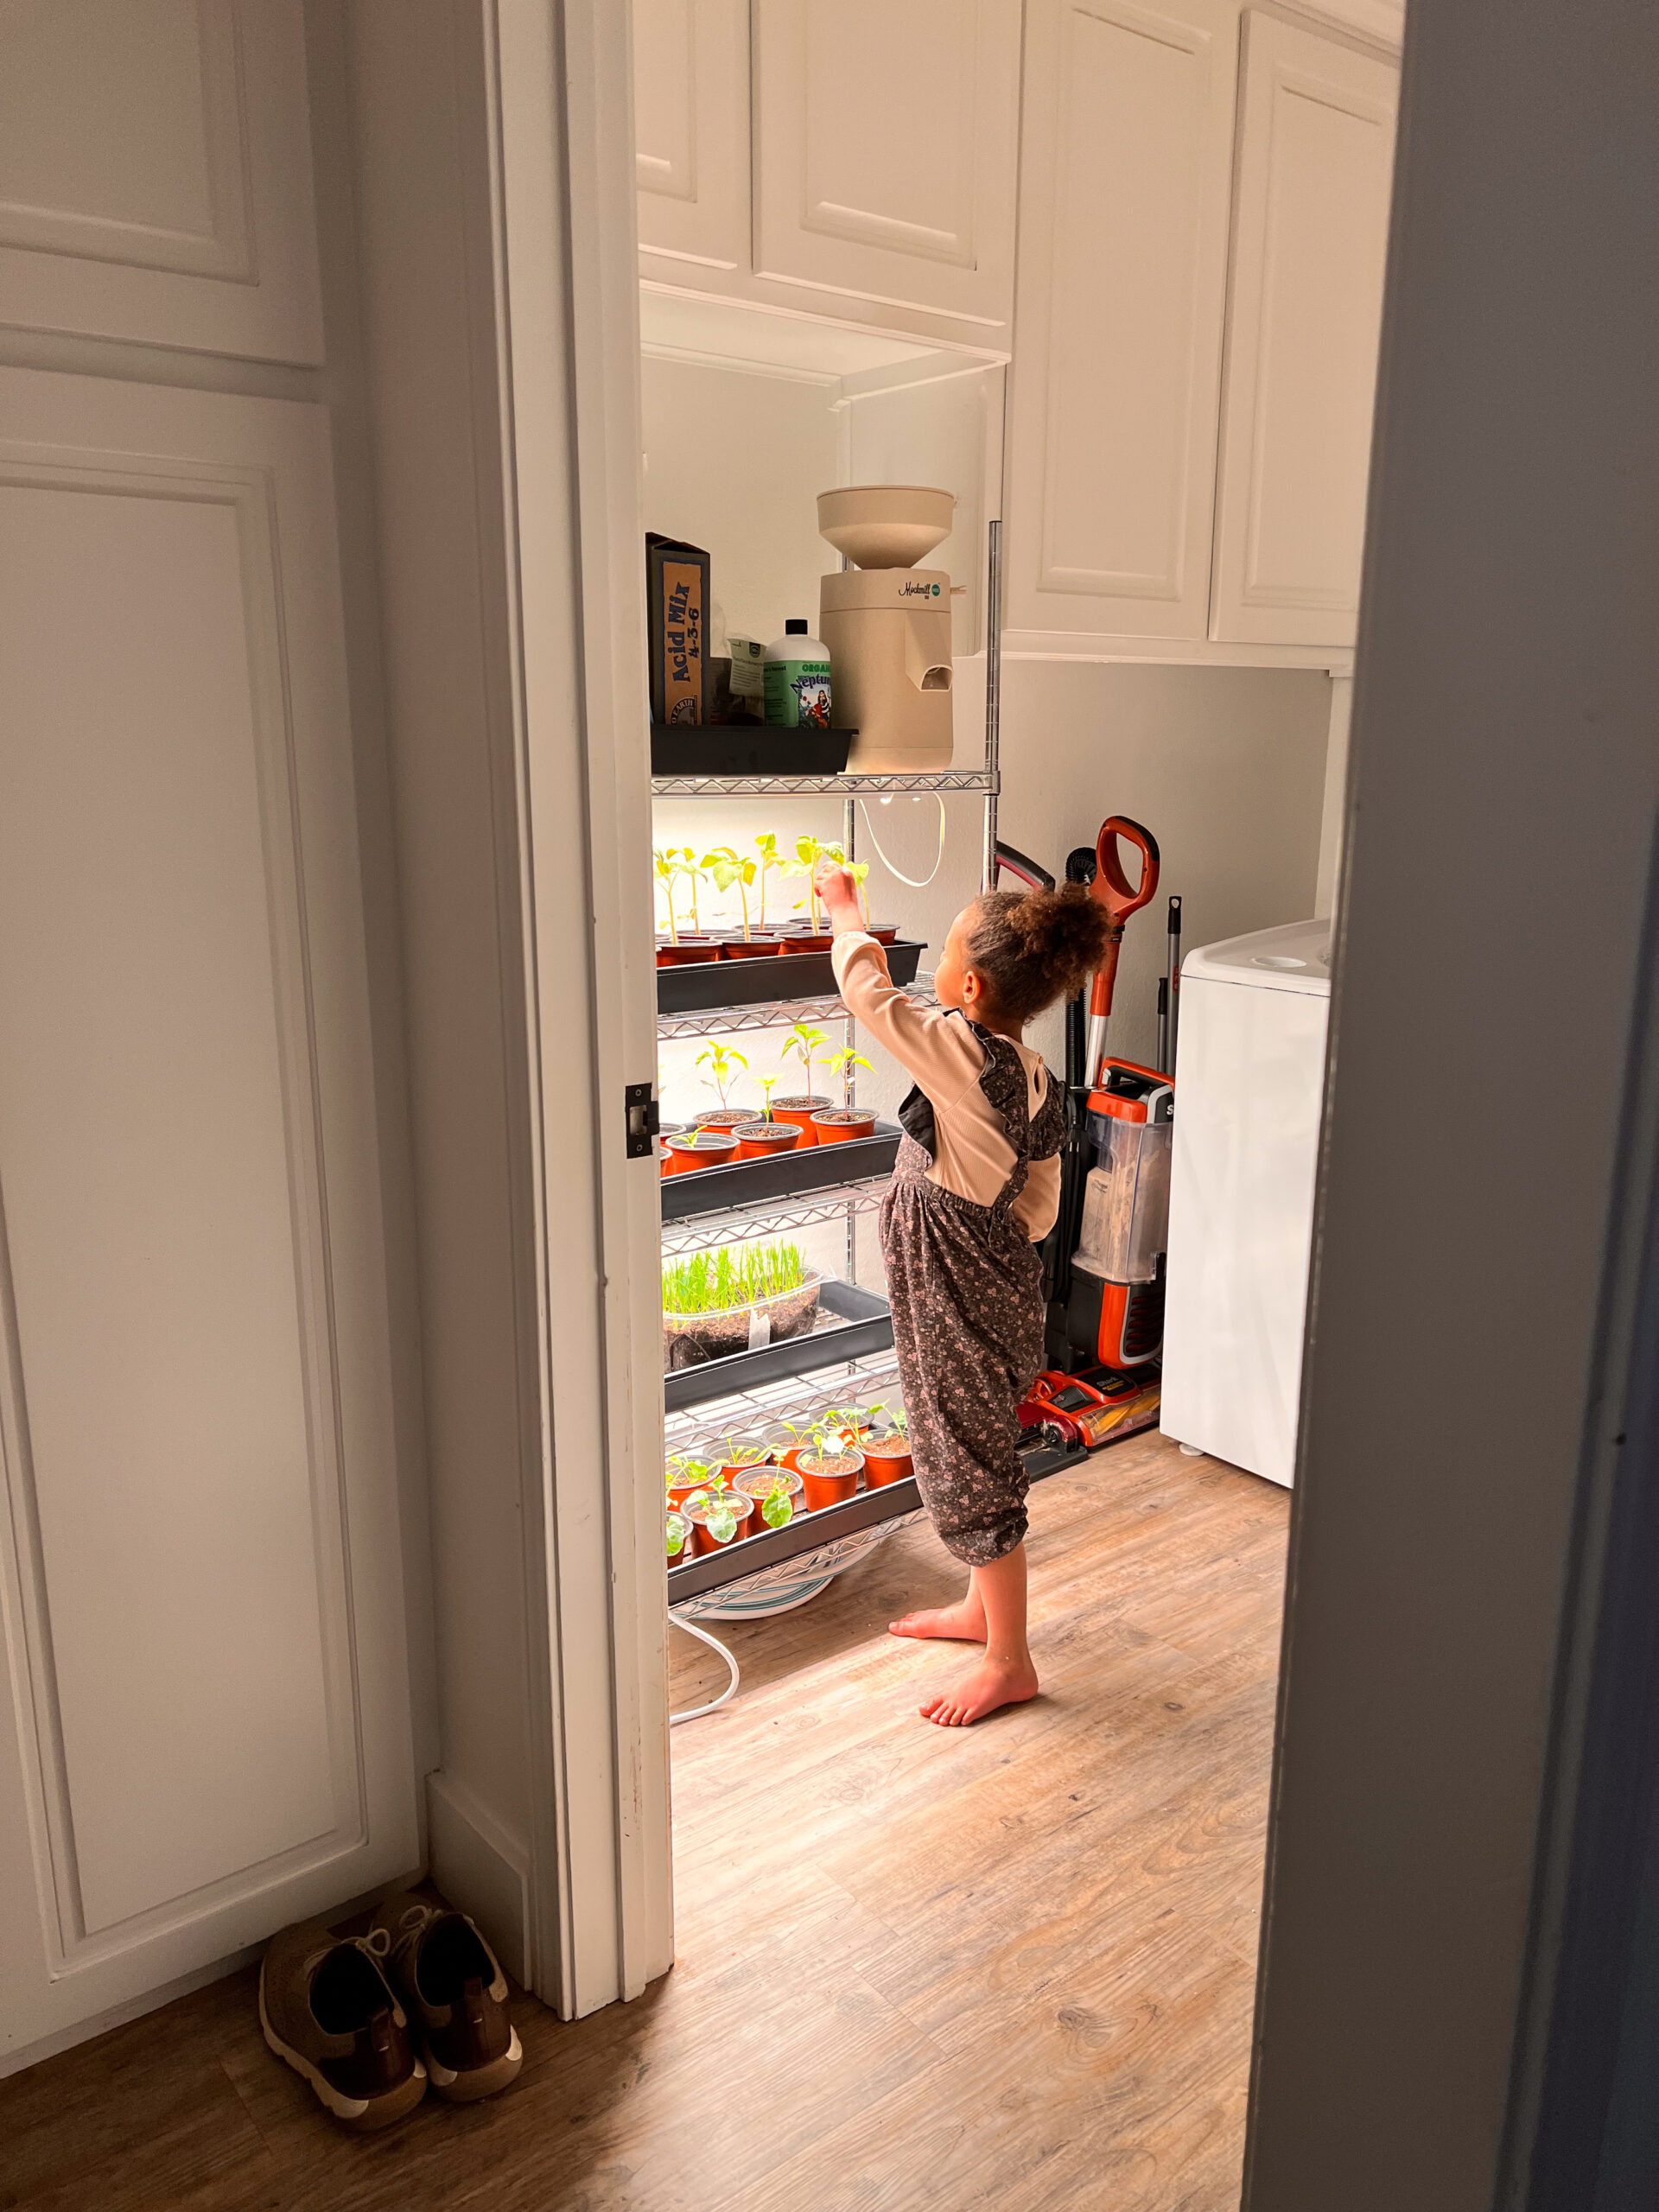
Light Matters
Sunlight through a window can help, but it often isn’t enough. Grow lights positioned about 2–3 inches above seedlings provide consistent light for 14–16 hours a day. Using a timer makes this hands-off and reliable.
My Favorite Tools:
- Adjustable seed starting shelves with grow lights
- Germination heating mats for heat-loving crops
- High-quality potting soil like Happy Frog or Fox Farms
These tools create a fertile, well-lit space that nurtures seedlings from the moment they sprout. For more of my favorite tools, check out this post.
Soil, Pots & Watering
Soil Mix
Use a light, nutrient-rich seed starting mix or potting soil to give delicate roots an easy path. You can add bone meal, blood meal, or worm castings for extra nourishment especially for heavy-feeding crops.
Pots and Trays
I don't recommend using basic plastic pots and trays for seed starting because they will not last very long. These seedling trays, pots, and humidity domes are thick and durable and worth the up front investment. I use these stainless steel trays underneath my pots and they have held up very well. Soon I'll also be sharing what I use for soil blocking.
Start seeds in smaller cells and then move them into larger containers as needed. This helps maximize your shelf space.
Watering the Right Way
Bottom watering or adding water to a tray so seedlings draw moisture from beneath helps prevent soil erosion, disease, and mold. Start with gentle misting until seeds germinate, then transition to bottom watering. Only water when the top centimeter of soil is dry. Once seedlings get their first set of true leaves, mix seaweed fertilizer into their water every other week for the healthiest seedlings.
Ventilation
A small oscillating fan on low helps strengthen stems and reduce mold by circulating air. Strong airflow mimics gentle wind, teaching seedlings resilience early on.
Planting Seeds Correctly
Fill your containers to the top with soil before sowing. Soil will settle as it absorbs water. Then:
- Check seed packet depth recommendations
- Plant seeds at the correct depth
- Lightly cover and mist
- Use a humidity dome or plastic wrap to retain moisture until germination begins
- Once sprouted, remove coverings to increase airflow
This simple process ensures seeds have the moisture and warmth they need to sprout strong roots.
Thinning Seedlings: Choose the Best
It’s common to plant 2–3 seeds per cell to ensure good germination. Once they sprout, thin to one seedling per pot to prevent competition for light, water, and nutrients. Use small scissors to snip the weaker seedlings at soil level, selecting the one with the stoutest, healthiest stem.
Transplanting Before Hardening Off
If seedlings outgrow their starter pots, transplant them into larger containers especially for plants like tomatoes. Indicators include: roots emerging from drainage holes, soil drying out fast, and a disproportionate top for pot size.
Handling seedlings by the soil ball (not the stem) prevents damage.
What Is Hardening Off? Why It Matters
Hardening off is the slow transition from indoor life to outdoor conditions. This crucial step prevents shock by acclimating seedlings to wind, sun, and cooler temperatures. A rolling seed starting shelf makes it easier to roll the seedlings outside when needed.
Hardening Off Steps
- Start 1–2 weeks before transplanting
- On day one, place seedlings outdoors in shade for 1–2 hours
- Increase time outside daily
- Gradually introduce them to sun and outdoor wind
- In final days, allow them to spend a full day outside and maybe a night if temps permit
This gentle transition builds resilience and prepares plants for life in your garden.

Timing Is Everything
Use your last frost date as your planting guide, not just your hardiness zone. Count backwards to schedule indoor seed starting so that seedlings are robust and ready to move outside without becoming leggy or stressed.
Troubleshooting Tips
- Leggy seedlings? They need more light and gentle airflow avoid too much heat alone.
- Mold or algae? Improve ventilation and adjust watering.
- Slow germination? Consider heat mats for warmth, especially with peppers and tomatoes.
These simple adjustments can meaningfully boost your seed starting success.
A Seasonal Rhythm Worth Cultivating
Growing plants from seed is one of the most rewarding rhythms in homestead gardening. You watch potential sprout into life. You nurture, adjust, learn, and celebrate growth.
And every seedling you transplant carries the lessons of careful timing and mindful care.
Join Our Homestead Gardening Community
If you want support, encouragement, and step-by-step help through every stage of your seed starting journey from creating a seed starting station to planting in the garden — I’d love to invite you into my Skool community.
Inside, we share practical guidance, seasonal plans, troubleshooting help, and conversations with fellow gardeners who are learning, growing, and building resilient homestead gardens together.
Whether you’re planning your first seedlings or your fifth season, come join us and grow with confidence.

Hi, I’m Victoria!
I document our homesteading journey on YouTube: covering sourdough, fresh milled bread, gardening, and simple living. Click here to watch, learn, and be inspired to start your own homestead at home.

Comments
No Comments